Frequently Asked Questions - Course Manager
How do I...?
show trainees the correct answers on the quiz results page?
On the Quiz Settings page, under Advanced Settings: Always Display Graded Responses: select Yes.
set a minimum amount of time a trainee must spend on a particular course page?
In the content editor, select the page on which you want to add a minimum time. The page timer is displayed at the bottom center of the page. Enter a minimum value. When a minimum time value is set, trainees may not navigate from the page until the minimum time is reached.
add HTML content to a course using a .zip file?
HTML files can include any web-compatible object, including audio, video, images, links and text. HTML files can be created using any standard HTML editor, such as Dreamweaver or BBEdit.
.zip file requirements:
- All content must be contained within a single .zip file.
- Content pages must be in HTML format and have an extension of .htm or .html.
- Content pages must be put in the top .zip file folder.
- Supporting content files (e.g. images, audio files, etc.) must be contained in a separate sub folder within the .zip file (choose any name for the sub folder).
- Content pages will be ordered according to their filenames.
- The page names given to your content will be taken from the HTML <TITLE> tag. If no <TITLE> value exists, then the filename will be used.
To upload .zip files:
- From the Upload Content area, click ZIP.
- Click the Browse button to select the .zip file on your computer. Click OK.
- Specify the sections comprising the course. (You must have at least one section, but you can create as many sections as you like).
- Move the uploaded pages into the appropriate sections.
add a PDF file to my course?
You can deliver PDF files as part of your course content. PDF's are best used when you have course content that is heavily formatted and HTML would be cumbersome to use.
When using PDF files as part of your training course, you may want to break up the content into separate pages. Although you could upload a single, large PDF file it would be difficult for trainees to manage the content - and they would have to review the entire document each time they resume the course.
NOTE: Trainees with iOS devices will not be able to scroll through the PDF content due to a limitation of the browser. Please see below to enable PDF download for iOS users.
To add a PDF to your course (not including iOS devices):
- In the Manage Content area of the page, click Edit Content.
- Click the section or page name where you want to add the PDF content. Choose Add > Page from the menu.
- Type a page title.
- Click the PDF icon
 on the editor toolbar.
 - Scroll down and click Browse to find the PDF file on your computer.
- Click Add Page on the bottom right of the screen.
To enable PDF download for all devices (including iOS device users):
- In the Manage Content area of the page, click Edit Content.
- Click the section or page name where you want to add the PDF content. Choose Add > Page from the menu.
- Type a page title.
- Type something like 'Click here to download the PDF if you are unable to scroll through the entire document.'
- Highlight 'Click here'. Then click the hyperlink tool on the toolbar.
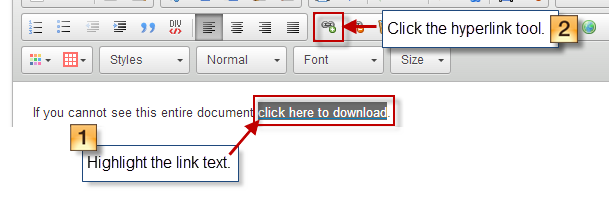
- Select <other> from the Protocol dropdown and enter the name of your PDF file in the URL box. This is the same PDF file that you will embed in the next step, so you only have to upload the document one time.

- Click OK then click Update Page on the bottom right of the screen.
add an image to my course?
- Click the
 Image button on the editor toolbar.
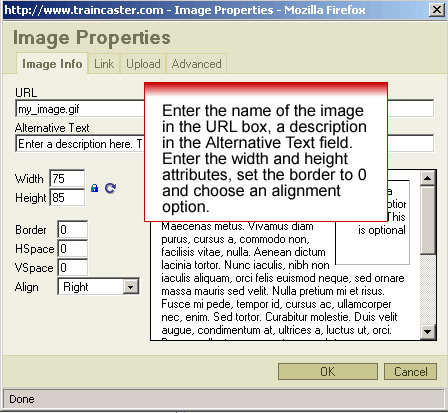
- Enter the name of your image file in the textbox that is displayed. You can use any browser compatible image type: .png, .jpg, .gif, .bmp.
- Click Add or Modify Page.
- Click BROWSE to find the image file on your desktop computer. Click UPLOAD FILES.
add an audio clip to my course?
- Click the audio button
 on the toolbar.
- Enter the name of your audio file in the textbox and click OK. You will be prompted to upload the audio file on the next page.
- At the bottom of the page, click Add or Modify Page.
- On the next page click BROWSE to find the audio file on your desktop computer. Click UPLOAD FILES.
add a video to my course?
- Click the Video icon
 on the editor toolbar.
 - Enter the name & dimensions of your video file in the textbox that is displayed. Click OK.
- Scroll down, click BROWSE to find the video file on your desktop computer. Click UPLOAD FILES.
- Click Add or Modify Page.
add a flash movie to my course?
- Position the cursor where you want to insert the Flash clip. Click the Flash icon
 on the editor toobar.
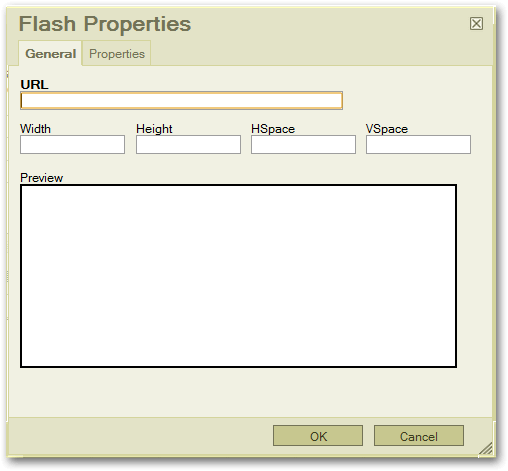
 - In the Filename box, type the name of the .swf file. Enter the height and width attributes as well. If you want to add space between the text on the page and the Flash movie, enter a value for HSpace (horizontal space - 8 is a good value); and a value for VSpace (vertical space - again 8 works well.
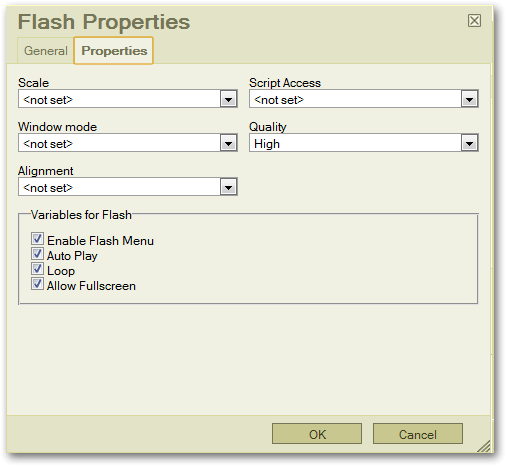
- You can customize how the Flash clip will play on the page by clicking the Properties tab. Below are our recommendations for setting the property values.
Scale: Show All
Script Access: Always
Window mode: Window
Quality: either Auto High or Medium (you can use High if you don't experience issues will playback performance)
Alignment: Left, right, top or bottom
Variables for Flash: If you do not want the movie to start playing automatically, uncheck the box next to Auto Play. If you do not want to enable full screen (may cause distortion), uncheck the box next to Allow Fullscreen.
Click OK to close the text box.
- Click Add or Modify Page at the bottom of the page.
- On the next page, Click BROWSE to locate the file on your computer. Then click Upload Files.
update voiceovers in PowerPoint?
- All audio files must be embedded in the PowerPoint file, not linked externally. This is controlled by a setting on the Options screen, under the Tools menu.
- On the General tab there is an option "Link files with size greater than...". Increase this setting to be 100 Kb.

- Now setup your audio recording options. Pull down the Slide Show menu and choose Record Narration.
- Click the Change Quality button.
- Pull down the Name menu and choose Radio Quality. Then set the Attributes to be those shown below. This level of quality should not cause download problems, while still maintaining sound quality.
add an image, audio clip or video into a quiz question?
- Cut and paste the following HTML snippet into the quiz question text box.
<img src="myImage.gif"> - Then change the src="myImage.gif" to the name of your image. Your image can be any browser support type: .gif, .png, .jpg, .bmp
- Click Add Question.
- On the next page, click Browse to find the image on your desktop computer. Click Upload Files.
add classroom training results?
- Click the Classroom tab.
- Click Set Attendance in a session box.
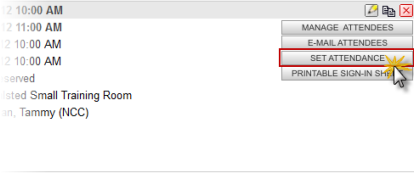
- Complete the form, including total time, location and training notes for this classroom session.
- All registered attendees are automatically set to receive credit for this course. You can change the status to Absent or Excused. You can also change the Pass/Fail indicator and passing percentage.
- You can have a Course Completion Notice sent to trainees that completed the course by selecting the option at the bottom of the page.
- Click Add Completion Records.
make a quiz required?
This setting applies only to non-sequential courses.
- Click Edit Content.
- Click the quiz name and select Settings from the menu.
- Scroll down to the Required setting. Click the yes radio button.
send a broadcast email to trainees in a particular course?
To send a broadcast email:
- Click the Notifications tab.
- Click the Broadcast Message link.
- Enter a subject line and message.
- If you want to include user login information, click the check box.
- Click Broadcast Message.